
Let's get you excited - To build your first Chrome extension you're only going to need to create four files and an icon image!
What is a browser extension?
A browser extension is a handy piece of software that sits on the top bar of your browser, you probably have plenty installed already. They can be things such as screenshot tools, ad blockers, password managers, VPN's and so on.
They are special in that they can control and action things on pages that you're browsing, this can be really handy for automating long and boring tasks such as unfollowing everyone on Twitter.
If you've new to coding and looking for something that will inspire you to start your journey then this could be ideal. Shortly, you'll have your own piece of software running in your browser - Cool eh!
Get started
What we're going to build today is super simple and a really basic introduction into browser extensions. We'll build an extension that once pressed will fetch and display your IP address.
Knowing your IP address can sometimes be useful, certain servers and systems will only give access to IP's that they have white listed.

To do this, all we're going to need is a bit of basic knowledge in HTML, CSS and JavaScript. And it's a good idea to checkout Google's documentation too.
Right, lets get to it!
Code editor - If you haven't coded anything before, you might be wondering what software to use to write code in. You could use something simple as Notepad if you're crazy enough, but most people use IDE's (program to write code in). Visual Studio Code is a free, light and simple to use IDE.
- Create a folder on your computer for your extension, something like
/MyIpAddress. - Start your IDE and open the folder.
- Now in there, we're going to create four empty files in our folder:
manifest.json,popup.html,popup.css&popup.js - Create another folder inside
MyIpAddresscalledimageswhich is where we'll store the icons for the extension. - In the images folder, we'll create four image files. This will be the same icon but different sizes, we'll have
logo128.pngsized at 128x128 pixels.logo48.pngsized at 48x48 pixels and so on.
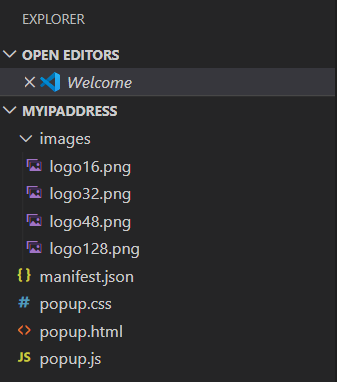
Once you're done with these steps, your folder structure should look like this:
Icons
Okay, let's get to a fun part. Each extension needs an icon or a logo. We want it to be unique and identifiable, it's where we can get really creative.
I'm sure you could use Paint or any standard software that comes with your laptop, but there are lots of free tools out there which have more functionality such as GIMP, KRITA or you could use an online tool such as PIXLR.
6. In the software of your choice, load up logo128.png, set the size to make sure it's square and 128 by 128 pixels and then design away!
Once you're happy, save it and then resize and save a 48x48, 32x32 and 16x16 version.
Alternatively, you can just save the image below and resize that if you don't have any creative juices flowing right now :)
Manifest
The manifest file is where you can configure your extension, setting it's name, description, version, etc. It's also where you can setup permissions and actions, you can learn more about this in the official documentation.
7. Update your manifest.json file to the following, of course you can change the name and description if you like!
You can see that we set the default_popup to our empty HTML file popup.html. We also set the location for the extension icons.
{
  "name": "My IP Address",
  "version": "1.0",
  "description": "Check & copy your IP Address anytime",
  "browser_action": {
      "default_popup": "popup.html",
      "default_icon": {
          "16": "images/logo16.png",
          "32": "images/logo32.png",
          "48": "images/logo48.png",
          "128": "images/logo128.png"
      }
  },
  "icons": {
      "16": "images/logo16.png",
      "32": "images/logo32.png",
      "48": "images/logo48.png",
      "128": "images/logo128.png"
  },
  "manifest_version": 2
}HTML
When a browser extension icon is clicked it normally opens a popup box, this area is a HTML document, which can be styled with CSS and controlled via JavaScript.
Our popup is going to look very simple, all we want to have to display is the user's IP Address and a button so that they can copy the address.
8. Update your popup.html file to the following:
<!DOCTYPE html>
<html>
  <head>
    <link rel="stylesheet" type="text/css" href="popup.css">
  </head>
  <body>
    <div class="container">
      <div id="ip">Fetching</div>
      <button id="btnCopy" class="btnPrimary">Copy</button>
    </div>
    <script src="popup.js"></script>
  </body>
</html>You'll see that we have a <div> element with Fetching inside. This is because we first have to make a request to an API in order to get the IP address, once we have the address we can change the 'Fetching' text. We handle this in the JavaScript file.
We also reference our popup.css & popup.js files here which we'll look at next.
CSS
Now it's time to style our popup, we're wanting to make sure that we have a nice looking button to copy the IP address and both elements align next to each other.
You could play around with the design a bit, make your extension unique.
9. Update your popup.css file to the following:
html {
    width: 280px;
    padding: 0 10px;
}

button {
    text-transform: uppercase;
    color: white;
    background-color: blue;
    transition: all .2s ease-in-out;
    height: 1.9125rem;
    padding: 0 1rem;
    border: none;
    border-radius: 2px;
    cursor: pointer;
    text-align: center;
    user-select: none;
    letter-spacing: .03em;
}

button:hover, .btn:hover {
    background-color: green;
}

.container {
    display: flex;
    justify-content: space-between;
    align-items: center;
}

#ip {
    font-weight: 500;
    font-size: 28px;
    color: #444;
    text-align: center;
}JavaScript
Right, to the juicy stuff, JS is where we can control what happens when our extension is accessed.
We're going to need our popup to go and fetch the IP address from a server somewhere, we can use the awesome free API service Ipify. The other thing we'd like is a button so that the user can copy the address to their clipboard.
What's an API? Think of it as a service that can return data when it's called. For example, you could ask a weather API to return you information on your city 'New York'.
10. Update your popup.js file to the following:
If you're new to software development, any line starting with // is a comment to help you understand what the code is for.// Select the <div> and <button> from popup.html
// as we want to change/action these.
let divIp = document.querySelector('#ip');
let btnCopy = document.querySelector('#btnCopy');
// Assign a 'onclick' event to the button
// which copies to the clipboard the text in the <div>
btnCopy.onclick = () => {
const el = document.createElement('textarea');
el.value = divIp.innerHTML;
document.body.appendChild(el);
el.select();
document.execCommand('copy');
document.body.removeChild(el);
};
const getIp = async () => {
let ip = 'No internet';
// Send a request to the Ipify API to return the user's
// IP address, example: '123.4.5.67'
let response = await fetch('https://api.ipify.org/');
if (response.ok) {
ip = await response.text();
}
// Set our <div> to the retrieved IP address
divIp.innerHTML = ip;
}
// Run the 'getIp' function once the popup is loaded
getIp();Job done - add to Chrome!
Boom boom, we're ready to test out what we've built, following the next few steps and we're there.
11. In Chrome navigate to: Settings > Extensions
12. Turn on Developer mode which can be found in the top right hand corner.
13. Then click on Load unpacked and select the folder we've been working in /MyIpAddress.
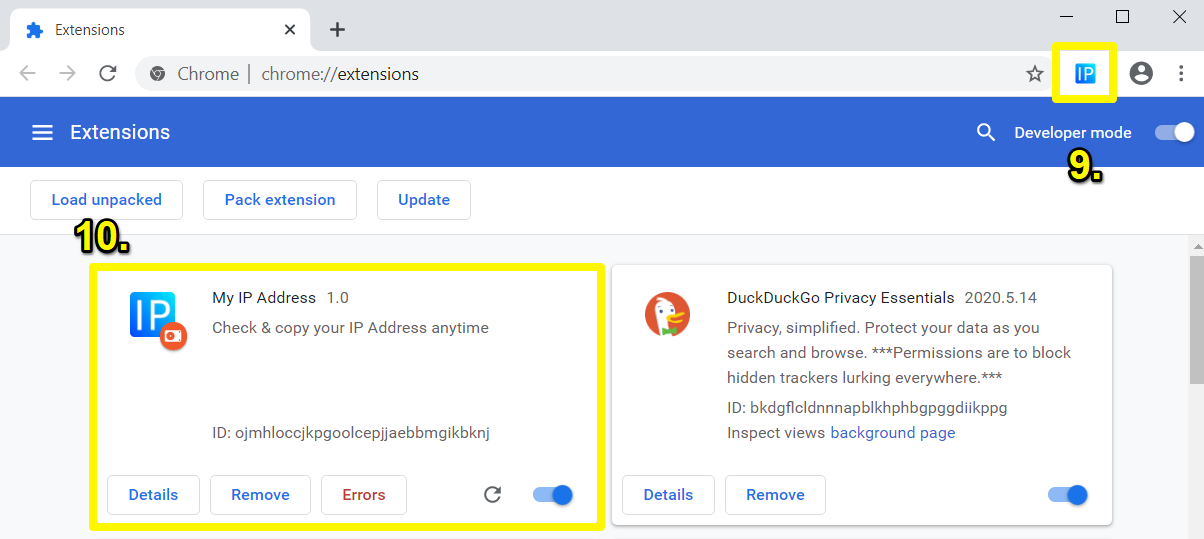
Congrats! You can now see your first Chrome extension loaded into your browser.

What next?
The possibilities are endless, maybe you have an idea of something you'd like to build, now that you've seen how easy it is to get started.
If you're really new to software development, you could read up some more on HTML, CSS and JavaScript or even uses online tools such as Codecademy to learn to code.
Here's a few more suggestions:
- Change the design and add information about the IP Address, such as it's geographical location. Ipify can help with that!
- Use a different API, such as Coindesk to show the latest Bitcoin price or something like that
- Read through the official documentation to learn a lot more about the power of browser extensions. It includes information about publishing to the store and monetization, etc.
- Check out more of our tutorials!